There are multiple forms of LINQ when using
Microsoft Visual Basic, such as LINQ for DataSets and LINQ To SQL. We
will use LINQ To SQL, which is one technology that extends the
abilities of Visual Basic 2008.
LINQ
To SQL is a way for Visual Basic to create classes that represent data
entities. You can use these entitites to describe a table in which you
then use LINQ to query or manipulate the underlying data or structure.
You define a class that represents the implementation of the SQL
structure and attributes.
I will describe one way to create the Data Entity class implementation for LINQ To SQL.
Creating the Users Table Data Entity Class with LINQ To SQL File
The
easiest method of creating the class is to use the LINQ To SQL tool
built into Visual Studio 2008. To do this, select your project header,
right-click, and choose New Item. Select LINQ To SQL File, and in the
File Name box type Users.dbml, and click Add.

Now
that you have a new blank file, you need to be able to drag entities
onto the canvas. Therefore you must create a connection to SQL Server
that has the objects that you want to represent in LINQ syntax. By
default you won’t have a connection to any Microsoft SQL Server
database servers so we need to create one.
Click
the Server Explorer tab. Right-click Data Connections and select Add
Connection. Fill in the appropriate Connection Type, which in my case
is a local Microsoft SQL Server database server using Windows
Authentication.
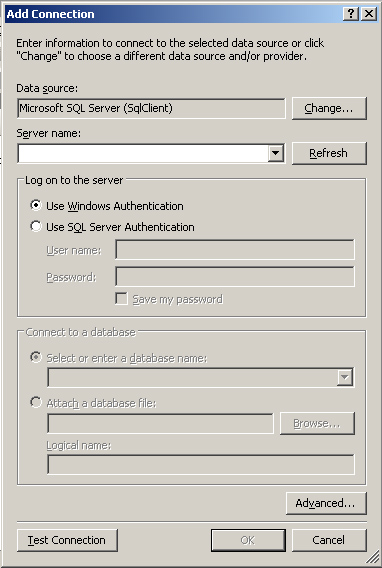
Enter your SQL Server name and authentication type. In the Database drop-down box, select your Tutorials database and click OK.
A
connection to the database is now added, and the available tables,
stored procedures, and other database objects are available to drag
onto the Users.dbml designer window.
Drag
the Users table and the SaveUser stored procedure onto the canvas. You
will see the table added to the canvas directly, but when you drag the
stored procedure it will appear in a list, in a split window to the
right of the table listings. At the top left of the dbml file you will
see a Method Pane button, which will turn off viewing the stored
procedure list pane.
When
you add tables, stored procedures, or other objects to the dbml file
and then save the file, the tool automatically generates the code
information that links LINQ to the SQL entities it describes. Visual
Studio 2008 will then generate an Application.Settings entry which will
be used by the newly generated LINQ class as the connection string. If
you go to your project’s properties and click the Settings tab, you
will see the newly created entry.

If
you want to view the code of the dbml file, you can choose File, Open
File, browse to your solution file folder, and then open the
Users.designer.vb file. This file is not listed in your project list
and is not accessible by clicking the dbml file.
You will see a UsersDataContext class and a Users class, which have been generated to support the LINQ To SQL code. The UsersDataContext class represents our connection to the underlying data entity as well as our usage of defined stored procedures. The Users class represents the data entity and describes the table and its columns, indexes, and keys.
Because the file is extremely large, I won’t copy the entire file here, but Listing 1 shows a snippet of what it looks like.
Listing 1. UsersDataContext LINQ To SQL implementation.
Partial Public Class UsersDataContext
    Inherits Global.System.Data.Linq.DataContext

    <Global.System.Diagnostics.DebuggerNonUserCodeAttribute()> _
    Public Sub New(ByVal connection As String)
        MyBase.New(connection)
    End Sub

    <Global.System.Diagnostics.DebuggerNonUserCodeAttribute()> _
    Public Sub New(ByVal connection As Global.System.Data.IDbConnection)
        MyBase.New(connection)
    End Sub

    <Global.System.Diagnostics.DebuggerNonUserCodeAttribute()> _
    Public Sub New()
        MyBase.New(Global.Tutorials.My.MySettings.Default.TutorialsConnectionString)
    End Sub

    Public ReadOnly Property Users() As Global.System.Data.Linq.Table(Of User)
        Get
            Return Me.GetTable(Of User)
        End Get
    End Property
|
The snippet represents the UsersDataContext class, which creates our connection to the database and also implements the ability for us to retrieve an instance of the Users class represented in Listing 2.
Listing 2. LINQ To SQL Users class DataEntity implementation.
<Global.System.Data.Linq.Table(Name:="dbo.Users")> _
Partial Public Class User
    Inherits Object
    Implements Global.System.Data.Linq.INotifyPropertyChanging,
      Global.System.ComponentModel.INotifyPropertyChanged
|
The Users class is the real meat of the LINQ project. Without it, we could not interact with or use our underlying entity.
Creating a SQL Class
Now
that we have LINQ code generated—connecting us to our data source and
entities—we need to generate the Visual Basic code that will allow us
to query, retrieve, and insert new records into our Users table.
Add
a new class file to your project and call it SQL.vb. This class will be
the layer between our LINQ To SQL class code and the Microsoft SQL
Server database data source.
For the first example we will use a fairly straightforward class that will allow us to call an overloaded <InsertRecord> method, as shown in Listing 3.
Listing 3. LINQSQL wrapper class for integration with Users.dbml.
Public Class LINQSQL
    Public Sub New()
    End Sub
    Public Function InsertRecord( _
                               ByVal First As String, _
                               ByVal Last As String, _
                               ByVal Address1 As String, _
                               ByVal Address2 As String, _
                               ByVal City As String, _
                               ByVal State As String, _
                               ByVal Zip As String, _
                               ByVal phone As String, _
                               ByVal UserID As String _
                               ) As Boolean
        Try
            Dim newuser As User = New User()

            newuser.UserID = New Guid(UserID)
            newuser.FirstName = First
            newuser.LastName = Last
            newuser.Address1 = Address1
            newuser.Address2 = Address2
            newuser.City = City
            newuser.State = State
            newuser.Zipcode = Zip
            newuser.Phone = phone

            m_UDC.Users.Add(newuser)
            m_UDC.SubmitChanges()

            Return True
        Catch ex As Exception
            Throw New Exception(ex.ToString)
        End Try
    End Function

    Public Function InsertRecord(ByVal pszRecord As String) As Boolean
        Try
            Dim pszQuery As String = Nothing
            Dim pszVars() As String = Split(pszRecord, ",")
            Dim newuser As User = New User()

            newuser.FirstName = pszVars(0)
            newuser.LastName = pszVars(1)
            newuser.Address1 = pszVars(2)
            newuser.Address2 = pszVars(3)
            newuser.City = pszVars(4)
            newuser.State = pszVars(5)
            newuser.Zipcode = pszVars(6)
            newuser.Phone = pszVars(7)
            newuser.UserID = New Guid(pszVars(8))

            m_UDC.Users.Add(newuser)
            m_UDC.SubmitChanges()

            Return True
        Catch ex As Exception
            Throw New Exception(ex.ToString)
        End Try
    End Function
End Class
|
The code in Listing 3 is very simple. The overloaded method takes in either a string or a breakdown of the values of a new Users
class instance and then inserts that record into the database. This is
done by creating a new underlying connection to the database through
the UsersDataContext object and the default connection string, which is listed in our My.Settings project properties.
Unlike in normal database interactions using LINQ, we create an object instead of our User class and set the approriate values for a new record. When we finish setting those values we have to call the Add method on the db.Users object instance, where db represents our UsersDataContext and Users represents a static instance of the Users class.
Finally,
we call SubmitChanges on our UsersDataContext instance to save the
record and changes to our Tutorials database. If you don’t call
SubmitChanges, the data will not be written to the database.